October 27th, 2022
Continuing on our theme from last month of pushing static websites as far as we can. This week we will talk about adding a blog to your static website. Now before we get too far into this. I would not recommend you do this method unless you are well versed in HTML, CSS, and Javascript and are really determined to not use Wordpress. I really wanted to explore how far I could push vanilla Javascript and no web servers.
If you are looking for more information on what a static website is check out our previous article Contact Form on Static Website.
This is going to be Part 1 of getting our blog onto our static website. In this article we will work on storing the blog data and writing the main blog page.
First we need the blog data stored somewhere central for us to retrieve. We aren't storing any sensitive data and it needs to be easy to retrieve so instead of using a database (which I'm not sure we could even get working) we will use a JSON file. JSON is very easy to read and parse in Javascript. Below is the JSON file we will use
{
  "posts":
    [
        {
            "title":"Blog on Static Website",
            "date":"October 27, 2022",
            "teaser":"Continuing our exploration of using static websites and the challenges that you will face. We explore how you can build a blog using a static website.",
            "imageLink":"images/blog/2022/22-10-27/blog-main-thumbnail.png",
            "imageAlt":"Main view of the blog page from this website",
            "blogLink":"blog/2022/22-10-27-blog-on-static-website.html"
        },
        {
            "title":"Contact Form on Static Website",
            "date":"September 24, 2022",
            "teaser":"Static Websites are one of our specialties, but with static websites come challenges. In this article we discuss how we are able to run forms on our website with the help of Netify.",
            "imageLink":"images/blog/2022/22-09-24/contact-form-thumbnail.png",
            "imageAlt":"A contact form from this website",
            "blogLink":"blog/2022/22-09-24-contact-form-on-static-website.html"
        },
        {
            "title":"Hello World!",
            "date":"August 16, 2022",
            "teaser":"We are live! But that does not mean we are inexperienced. We have over 10+ years of software development experience we are ready to bring to your company...",
            "imageLink":"images/blog/2022/22-08-16/hello-world-thumbnail.png",
            "imageAlt":"Hello world shown in a terminal",
            "blogLink":"blog/2022/22-08-16-hello-world.html"
         }
    ]
}
To break things down we have an object called posts that is an array containing three different objects. Each object has a title, date, teaser, imageLink, imageAlt, and a blogLink. The title is the title of our post, the date is the date it was published, and the teaser is a small description of the post we will show on our main blog page. imageLink is a thumbnail we will display to show off our post and for good SEO we have an imageAlt which will be the images alt text. Lastly we have a link to our actual blog page. The blog pages will be created by you separately and then you link them in this JSON file. The order of the posts does matter, we use a descending order as that is how we want our blog posts to show up on our main blog page.
Next on the page where you want to show off all of your blog posts. Add the following section to the body and add the script to your head element.
<section id="blog-list" class="container">
</section>

<script type="text/javascript" src="scripts/blog.js" async></script>
Okay now it's time to do the heavy lifting! Below is the javascript file we imported just above. Make sure you add it to the same location or change the location in the script tag above.
function get_blog_posts(write_blog_posts) {
   $.getJSON("data/blog.json", function(data) {
       write_blog_posts(data);
   });
}

function write_blog_posts(data) {
   //Insert posts on page
   var rowAlt = false
   for (let i = 0; i < data.posts.length; i++) {
       let post = data.posts[i];
       var postCode = '';
       if (rowAlt) {
           postCode = '<section class="container row-alt blog-post">';
       }
       else {
           postCode = '<section class="container row blog-post">';
       }
       rowAlt = !rowAlt
       postCode += '<div class="grid">';
       postCode += '<section class="col-2-3 responsive-col">';
       postCode += '<a href="' + post.blogLink + '">';
       postCode += '<h2>' + post.title + '</h2>';
       postCode += '<h6>' + post.date + '</h6>';
       postCode += '<p><span class="tab"></span>' + post.teaser + '</p>';
       postCode += '</a>';
       postCode += '</section>';
       postCode += '<section class="col-1-3 responsive-col col-middle-align">';
       postCode += '<a href="' + post.blogLink + '">';
       postCode += '<img src="' + post.imageLink + '" alt="' + post.imageAlt + '"></img>';
       postCode += '</a>';
       postCode += '</section>';
       postCode += '</div>';
       postCode += '</section>';
       $('#blog-list').append(postCode);
   }
}

get_blog_posts(write_blog_posts)
We start at the bottom of the javascript file where we call the get_blog_posts function. This goes back to the top where we use jQuery to open and parse the JSON file we created earlier. Then with the result of that call we call the write_blog_posts function. In the write_blog_posts function we iterate through all the posts in the JSON file and insert the HTML code we want to use. Below is the result.
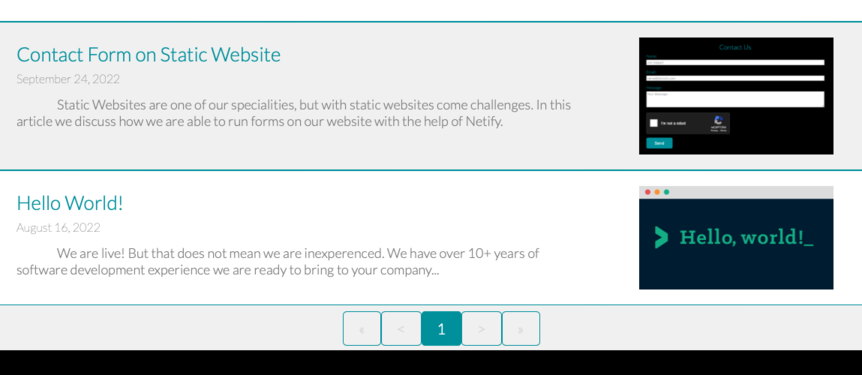
Done... right? Now some of you may be asking yourself what happens when we have a lot of blog posts? Will the user just have to keep scrolling? Well in the current form the answer is yes. But some of you may have also noticed in my photo we have a pagination control. So next month we will take a look at adding pagination to your blog. Stay tuned!
If you have any questions feel free to submit using the contact form at the bottom of this page and we will get right back to you as soon as we can. Thanks for reading!